Alright, so I wanted to share what I got up to in the kitchen recently. Had a little get-together planned, nothing too fancy, but you know how it is, you still want to put out a few decent bites. I was scrolling through ideas, and honestly, the thought of turning on the oven for complicated stuff just wasn’t appealing. That’s when I remembered those little phyllo cups you can buy. Game changer, seriously.

Getting Started – The Cups are Key
So, first things first, I headed to the store. Found a couple of boxes of those pre-baked mini phyllo shells. These things are a lifesaver, truly. No baking required for the shells themselves, which is exactly what “no bake” implies, right? I grabbed them, feeling pretty smug about my shortcut already. Back home, I just carefully took them out of their plastic trays. They’re a bit delicate, so you gotta be gentle, but it’s no biggie.
Figuring Out the Fillings – Savory First
Okay, with the cups ready, it was all about the fillings. I decided to do a couple of different kinds because variety is the spice of life, or so they say. For the savory option, I rummaged through my fridge.
- I found a block of cream cheese – I always prefer the block over the whipped tub for fillings, just has a better texture when you mix it yourself. Let that soften on the counter for a bit.
- Then, I chopped up some fresh chives. Had some in the garden, looking a bit sad, but still usable!
- A little bit of garlic powder, because, well, garlic.
- And a tiny squeeze of lemon juice to brighten it up.
I just dumped all that into a bowl and mashed it together with a fork. Didn’t even bother with a mixer. Kept it simple. Tasted it. Yep, that’ll do. Simple, classic, can’t really go wrong.
Next Up – Something a Little Sweet
For the second filling, I wanted something sweet to balance things out. I thought about chocolate mousse, but that felt like too much effort, still aiming for that “no bake, no fuss” vibe, remember? So, I went for a creamy, fruity thing.
- I had some good thick Greek yogurt. That was my base.
- Mixed in a spoonful of honey. Not too much, just enough.
- A tiny splash of vanilla extract. You know, for that little extra something.
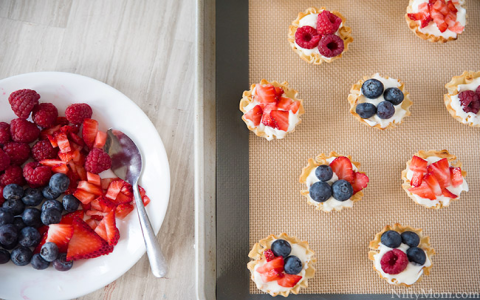
- Then, I grabbed a handful of mixed berries – some raspberries and blueberries. I gave them a quick rinse.
For this one, I gently folded the yogurt, honey, and vanilla. I decided to put the berries on top, rather than mixing them in, just for looks. Prettier that way, I think.
The Assembly Line – Filling ‘Em Up
This was the fun part, or maybe the slightly tedious part, depending on your patience levels. I just used a couple of small teaspoons. One for the savory cream cheese mix, one for the sweet yogurt. Carefully spooned the fillings into each little phyllo cup. You don’t want to overfill them, or they get messy. I tried to make them look somewhat presentable. Some looked better than others, haha, but that’s homemade charm for ya.
For the savory ones, I sprinkled a few extra chopped chives on top. For the sweet ones, I carefully placed a couple of berries on the yogurt. Just those little touches make a difference, you know?
The Grand Finale – Serving and Enjoying
And that was pretty much it! I arranged them on a platter. The savory ones on one side, sweet on the other. They actually looked pretty darn good, if I do say so myself. Took all of maybe 20-30 minutes, tops, not counting the cream cheese softening time. The best part? No oven, no complicated steps.
When my friends arrived, these were the first things to disappear. Everyone seemed to love them. Got a few “oohs” and “aahs,” which is always nice. The crispy phyllo, the creamy fillings – it’s a good combo. Super easy, super quick, and they look like you put in way more effort than you actually did. Definitely keeping this idea in my back pocket for future impromptu gatherings. You really can’t beat a good no-bake option when you’re short on time or just feeling a bit lazy!


