
Alright, so today I decided to tackle a classic comfort food: chicken and dumpling casserole, but the easy way, using Bisquick. You know, sometimes you just crave that warm, hearty meal, and this one usually hits the spot without a ton of fuss.

Getting Started – The Prep Work
First things first, I needed to get my chicken sorted. I had some boneless, skinless chicken breasts in the fridge. I just boiled them until they were cooked through. Some folks use rotisserie chicken, and honestly, that’s a great shortcut if you’re short on time. Once my chicken was cooked, I let it cool down a bit, then shredded it up. I find using two forks works best for shredding – just pull it apart. Easy peasy.
While the chicken was doing its thing, I grabbed my trusty 9×13 inch baking dish. No need to grease it or anything, in my experience. Then I rummaged through the pantry for the other key players: a can of cream of chicken soup (the condensed kind, of course), some milk, and that magical box of Bisquick. I also decided to throw in some frozen mixed veggies – peas and carrots mostly – because, well, why not? Adds a bit of color and, you know, vegetables.
Mixing It All Up
Okay, so with the chicken shredded, I dumped it into a big mixing bowl. To that, I added the can of cream of chicken soup. I didn’t dilute it with water like you would for regular soup. Then I stirred in about half a cup of milk and my bag of frozen veggies. I didn’t even bother thawing them; they cook just fine in the oven. Gave it all a good mix until everything was combined. This concoction then went straight into the baking dish, spread out nice and even.
Next up, the dumplings! This is where the Bisquick comes in handy. I followed the dumpling recipe on the box, pretty much. It’s usually something like two cups of Bisquick and two-thirds of a cup of milk. I just mixed those together in a separate bowl until a soft dough formed. You don’t want to overmix it, or the dumplings get tough. Just stir until it’s combined – lumps are okay, even preferred, I think!
Assembly and Baking Time
With the chicken mixture in the dish and the dumpling dough ready, it was time to assemble. I just dropped spoonfuls of the Bisquick dough all over the top of the chicken mixture. I try to make them roughly the same size so they cook evenly, but I don’t get too fussy about it. They’ll puff up and spread out a bit as they bake, covering most of the top.
Then, into the oven it went. I had preheated my oven to about 375°F (that’s around 190°C). I find that temperature works well for this. I let it bake for a good 30 to 35 minutes. You’re looking for the filling to be bubbly around the edges and the dumplings to be golden brown on top. If they start browning too quickly, you can loosely tent it with some foil, but I didn’t need to this time.
The Delicious Result
After what felt like an eternity (because it smelled so good!), I pulled it out of the oven. Let me tell you, the top was perfectly golden, and the filling was bubbling away. I let it sit for about 5 or 10 minutes before dishing it out. This helps it set up a little and prevents you from scorching your mouth, which I’ve definitely done before.
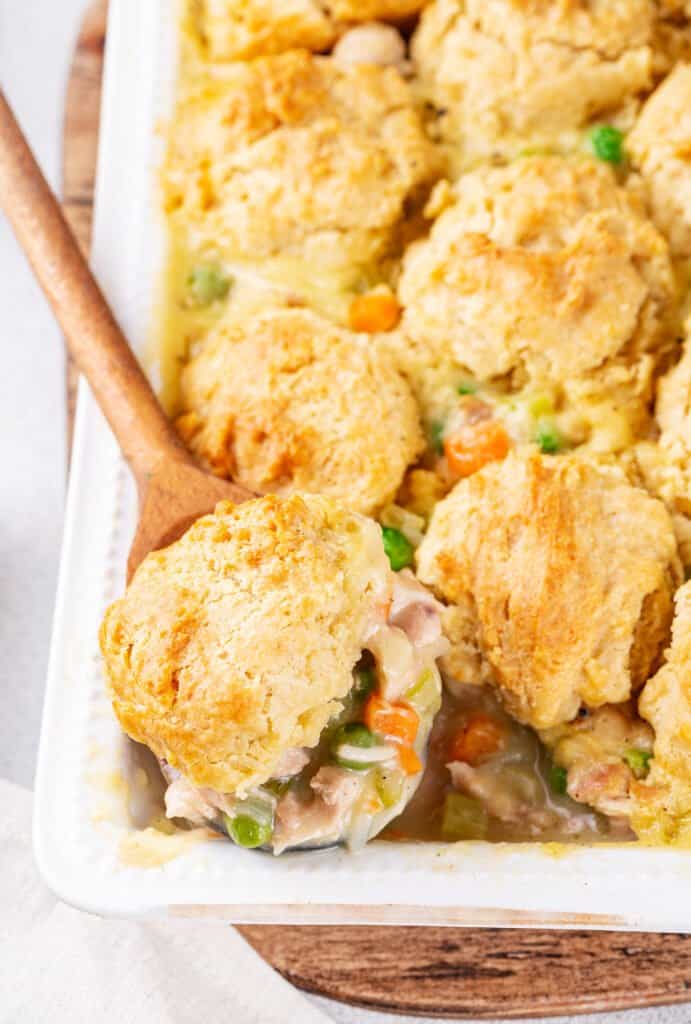
And there you have it! A super satisfying chicken and dumpling casserole. The dumplings were fluffy, the chicken mixture was creamy and savory. It’s not fancy, but it’s definitely delicious and incredibly comforting. Plus, using Bisquick makes the dumpling part so much easier than making them from scratch. A real winner for a weeknight meal when you want something hearty.
- Key takeaway: Don’t overthink it. This is supposed to be easy!
- Another tip: You can add other seasonings if you like – a bit of thyme or sage in the chicken mixture is nice. I kept it simple today.
So yeah, that was my adventure in making chicken and dumpling casserole with Bisquick. Turned out pretty darn good, if I do say so myself. Definitely making this again soon.


